It’s not called your center of gravity for nothing.
Whatever it is you want to do, your core is involved, and strengthening your core makes you better at it. A tougher center of gravity makes you a less resistible force and a less movable object no matter what you’re involved in. A stronger, healthier core can improve posture, increase strength and stability in your back. Strong core muscles also allow you to take in more air with each breath, which increases the output of your cardiovascular system so you can go harder for longer. The core also stabilizes and assists with lower-body lifts. Below you’ll find six exercises to give you a core that can do anything.
Before We Begin: 2 Exercises You Won’t See Here
For decades, core exercise was defined by the traditional sit up and the crunch. It makes sense: most other muscle groups benefit from specific, targeted exercise. The core, however, doesn’t function like the other muscle groups; your core work impacts the use and balance of everything else. Flexing your back over and over can lead to long-term damage, and focusing on one hyper-specific region of your core can lead to dangerous muscle imbalances. It also can strain your tailbone to use it as the fulcrum of fast, repetitive exercise. Plus, let’s be honest: staring at your own knees for five sets of 30 isn’t any fun.
Fitness model abs aren’t what we do. The SEALFIT athlete doesn’t train for the display model, but for when the rubber meets the road. The following are six exercises to give you a core that really works.
GHD Sit Up
While it borrows part of its form from the traditional sit up, the GHD (glute and ham developer) sit up offers more work with less strain. It not only targets the abs as the traditional sit up does, but the quadriceps as well, and the slow, controlled movements required improve posture and control of the spine.
The GHD sit up requires a hamstring curl machine, which is available at most gyms. Place your feet against the machine’s backstop, heels tucked under the holder, with the knees slightly bent and back straight. Lean backwards as far as you can go, fully extending your hands behind your head. Come back up in a slow, controlled manner until the back is perpendicular to the hips.
Make sure you’re keeping your movements slow and controlled on this. Moving too quickly or haphazardly not only puts you at greater risk of injury but can lead to muscle imbalances that affect real-life performance.
Strict Toes to Bar
Toes to bar works not only the abs, but develop the arm and grip strength required for heavier lifts. They also enhance hip flexion, a key requirement for most footwork techniques in sports.
To perform a toes to bar lift, find a pull up bar (you’ll need one tall enough for you to hang from it with legs extended). Keep your back straight and your legs fully extended. In a slow, controlled movement, flex the hips until your toes, as you might have guessed, touch the bar.
The flexibility required for a full toes to bar lift does not come easily. If you find yourself struggling to get all the way up, consider working in some lower body exercise to build strength in the hips.
Overhead Squat
Squats are often (rightly) thought of as a lower body exercise, but they provide key core work in stabilizing the body as the lifter comes back up. The overhead squat is particularly useful in this because it requires the full extension of the abs to keep the weight overhead. The extension of the weight to be lifted away from the center of gravity also requires and develops better balance and stability. It also mimics the final movement in the snatch and clean-and-jerk, making it a favorite among Olympic lifters, the most explosive people on the planet.
To execute the overhead squat, grip the weight with feet shoulder-width apart and hands wide like in a snatch grip. Remove from the rack (or have your spotter let go) with the weight at shoulder height and core contracted. Push through your heels and extend your knees to lift the bar overhead, With the back naturally arched and arms locked out. Lower your whole body until the hips are parallel with the knees, then bring yourself back to a standing position.
Note: proper form is always crucial for a weighted squat, but particularly so with the weight extended overhead. Make sure your squat form is absolutely squared away, and “guess low” until you figure out exactly what you can handle.
Single Arm Overhead Waiter Walk
It’s a long name, but the exercise is actually pretty simple. Grab a dumbbell with one hand, bring it to lockout overhead, and walk with it. As with all overhead weight exercises, make sure you’re only carrying what your grip strength will allow, and keep your back straight. Also, make sure your steps are stable and straight; move down in weight if you’re not able to maintain the pace.
In addition to the core, the waiter walk works the shoulder and arms, as well as the muscles stabilizing the back.
Planks
The plank is one of physical fitness’s best builders of mental toughness. It’s just you, on the floor, with nowhere to go and no contraction period to even get a quick breather. Nothing reinforces the ability to endure like forcing yourself not to move when your body screams for a break. Which says nothing of its physical benefits, including stability throughout the body.
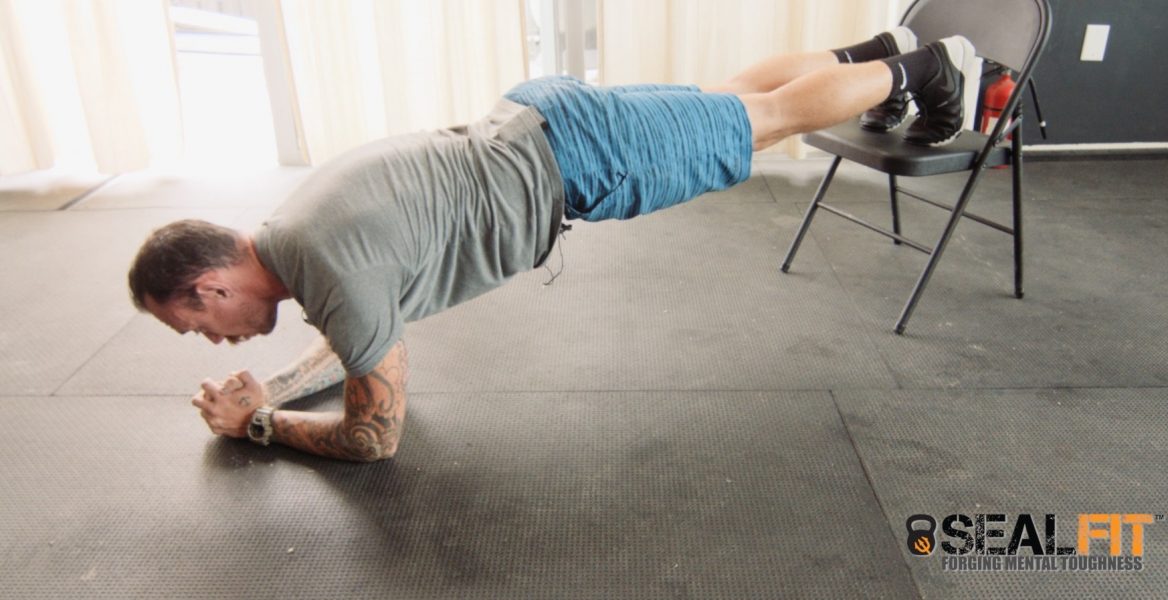
To perform a plank, get on the floor in a pushup position. Keep your back straight and flex your glutes. Now comes the hard part: stay there. You’ll hold that pose for intervals of 30 seconds to a minute.
As your core strength increases, consider enhanced positions relying on elevated feet, different hand placements, or raising a hand or foot in the air.
Mountain Climbers
Mountain climbers are one of the most explosive core exercise, meaning that they not only develop your muscles but provide the intensity you need in training to help you go harder, longer when it’s time to roll. The movement also develops the quads and shoulders, as they’re required to isometrically keep the body stable.
Start in a pushup position, with hands and feet shoulder width apart. Flex one knee and hip, bringing one knee under the body and the foot as close as possible to parallel with the hand. As quickly as possible, alternate the positions for your legs, bringing one leg back to the pushup position as the other comes under the body.
Since you push, pull, and drag every day, training the upper body only makes sense. In addition to the activities of daily living, most active exercise, from sports to physical labor, will at some point require you to carry heavy things or pick yourself up off the ground. A strong upper body will make you better at all of it.
Unfortunately, upper body discussion has been dominated by groups of exercises that build muscle for magazine poses but don’t add much to your functional life. Here at SEALFIT, we’re not about looking better but being better. The six exercises will help you build an upper body for every day of your life.
Pushup
You’re probably not surprised to see this here. Every sport, PT regimen and home fitness workout features a hearty helping of pushups, and for good reason. Though it primarily works the upper body, an exercise that begins and ends with a plank works every muscle group to some extent. A good pushup is also your ticket to enter a much wider world of upper body exercise. Unfortunately, it’s also one of the easiest exercises to cheat on, or unintentionally get wrong. Proper form is essential to get all the benefits of this staple of the exercise world.
To perform a proper pushup, begin in a plank position on your palms and the balls of your feet, with hands shoulder-width apart, feet together, and back straight. Lower yourself until your chest touches the ground, keeping your head up and back straight. As soon as your chest hits the floor…well, push up, locking your arms out in the original position.
Once you’ve mastered the classic pushup, try weighing yourself down or experimenting with hand and foot placement, as each distance apart or elevation at which you put your points of contact with the ground targets a different muscle group. At advanced levels of strength you can even try pushing your hands completely off the ground.
Dead Hang Pull Up
In many ways the dead hang pull up is the ultimate test of fitness. Suspended in the air and deprived of any cheat to give yourself momentum, it’s just your muscles against your weight. It’s no wonder it’s a key component of SEAL fitness, and by extension, of SEALFIT. It’s not only a full-upper-body workout, but involves the core and develops the grip strength required for heavier lifts.
A dead hang pull up starts with what you might imagine. Grab the bar at shoulder width and lock your knees; if your bar isn’t high enough for you to hang straight-legged, extend them in front of you until your toes clear the floor. Once you’re in position, throw your shoulders back and pull until your chin clears the bar. Try not to let your legs or arms swing; the point is to build strength, not generate momentum. Remember: you’re training to have the strength when you need it, not to put up more reps at the gym.
If you still need to work your way up to a pull up, start with negatives (beginning with your chin above the bar and holding until failure). Avoid weight-assisted pull ups, which take away from the full effort required of a pull up. Once you’re able to put together solid sets of five, start adding weight via a vest or straps.
Strict Dip
Suspending your entire body weight from your hands, the dip implicates everything from the shoulders to the core.
First, you need to find or improvise a dip bar. They’re available at parks and gyms everywhere, but in a pinch, two surfaces of equal height (i.e. a pair of sturdy chairs) will work. Place a hand on each side of the bar and raise yourself until your feet no longer touch the floor; if necessary, bend your knees to allow for a full range of motion. Starting at lockout, lower yourself until forearms are perpendicular to your triceps, then slowly raise yourself back to lockout.
If you don’t immediately have the strength, start with negatives. Start at lockout and very slightly lower yourself, hold until you’ve completely dropped, then get back on the horse. As with the pull up, you’ll want to avoid the assistance machine; negatives build the strength you need from day one rather than taking out any of the effort. Once you’ve mastered the basic dip, you can add nearly unlimited amounts of weight via a vest or belt.
Supine Row
A building block of the pull up, the supine row is also a great exercise in its own right. It primarily works the delts and lats but also uses the biceps and lower back. Since it requires you to hold most of your bodyweight in the air, it’s also great for grip strength.
To perform a supine row, find a low-hanging pull up bar, a pair of rings, or situate a Smith machine to chest height. Get underneath the bar, holding yourself up with arms extended to lockout. Once in position, pull your chest toward the bar until it touches, then lower yourself until back in the original position. Be sure the downward motion is slow and controlled, as recklessness can cause injuries to the wrist, elbow or shoulder.
Strict Press
Few exercises test the shoulders like the strict press. It’s also a dynamic, explosive lift key to building upper body endurance.
To execute a strict press, grip just outside the shoulders, with the weight level with your clavicle and feet under the hips. Extend your elbows in front of you to make sure the bar has a straight path upward. Tighten your back and drive the bar upward; don’t move the bar around your head, but rather lean slightly back to allow the bar to clear your chin. Once the bar is above your head, return to an upright position and lock out your arms at the top of your head. Reverse the movement to return to the starting position.
Bench Press
To execute, lie back on the bench with your back arched and feet on the floor, bar level with your eyes. Grip the weight at shoulder width, then remove from the rack (or if using dumbbells, have your spotter release). Lower the weight in a slow, controlled motion all the way to your chest, then push through your palms, raising the weight until your arms lock out.
Once you’ve gotten the hang of the conventional bench press, start adding weight or varying your grip. Each grip of the bar targets a different set of muscles within the overall group.
Leave a Reply cancel reply
You must be logged in to post a comment.


No Comments